
Glazing shop drawings are an important part of any project that involves glass. They include detailed instructions on how glass panels, frames, and hardware should be made and installed. These drawings help fabricators cut glass to the right size, guide installers during assembly, and allow contractors to check that everything fits properly before construction begins.
Without shop drawings, small mistakes can turn into big problems. Glass panels might not fit as expected, frames could be misaligned, and installations may take longer than planned. These issues can lead to delays, extra costs, and frustration for both builders and clients.
A well-prepared set of shop drawings helps avoid these challenges. It acts as a clear guide, making the entire process smoother, from manufacturing to final installation. In this guide, we will explore what glazing shop drawings include, why they are important, and how they improve the quality of glass projects.

Modules Of Glazing Shop Drawings
They include several key details that help turn design concepts into finished glass installations. Each component plays a role in making sure the glass fits correctly, stays secure, and meets the project’s needs. Below are the main elements found in these drawings.
Glass Types and Sizes
Different projects require different types of glass. Some need tempered glass for strength, while others use laminated glass for safety or insulated glass for energy efficiency. Shop drawings specify the type, thickness, and exact dimensions of each glass panel to avoid cutting errors and installation issues.
Frame and Mullion Details
Frames and mullions provide support for glass panels. Drawings show their materials, dimensions, and how they connect to surrounding structures. This helps fabricators prepare the right components and allows installers to assemble them without confusion.
Hardware and Fasteners
Glazing systems rely on hardware like hinges, handles, locks, and brackets to function properly. Shop drawings list each piece of hardware, its placement, and how it attaches to the glass or frame. Including these details helps prevent compatibility issues during installation.
Sealants and Gaskets
Sealants and gaskets keep air and water from passing through gaps between the glass and its frame. Drawings specify the type of sealant or gasket needed, where it should be applied, and how thick it should be. This helps maintain durability and weather resistance.
Elevations and Section Views
To give a complete picture of the installation, shop drawings include elevation and section views. Elevations show the glazing system from the front, while section views provide a cut-through look at how the glass, frame, and other components fit together. These views help installers understand placement and alignment before starting work.
Installation Instructions
Even with all the technical details, a glazing project can face problems if the installation is not done correctly. Shop drawings often include step-by-step instructions, showing the order in which components should be installed and any special techniques required. This helps installers work efficiently and avoid mistakes.
Why Glazing Shop Drawings Are Important?
Here are some key reasons why glazing shop drawings are important.
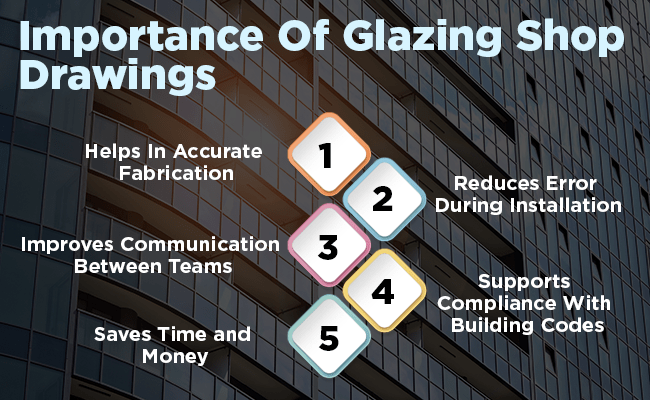
- Helps in Accurate Fabrication: Glass panels and frames must be cut and prepared with precision. Even a small mistake in size can lead to delays and wasted materials. Shop drawings provide exact measurements and specifications, helping fabricators produce glass and framing components that fit perfectly on-site.
- Reduces Errors During Installation: Installing glazing systems without proper drawings can lead to misalignment, gaps, and structural issues. Shop drawings show how each piece fits together, reducing guesswork and helping installers work more efficiently. This not only saves time but also prevents costly corrections.
- Improves Communication Between Teams: Glazing projects involve multiple teams, including designers, manufacturers, contractors, and installers. Miscommunication between these groups can cause delays and unexpected changes. Shop drawings provide a clear reference that keeps everyone on the same page, making coordination smoother.
- Supports Compliance with Building Codes: Different projects must meet specific safety and structural standards. Shop drawings include details that help contractors follow building codes and regulations, reducing the risk of legal or safety issues.
- Saves Time and Money: When every part of the glazing system is planned correctly, work moves faster, and fewer mistakes happen. This reduces rework, material waste, and unexpected costs, making the entire project more efficient.
How Glazing Shop Drawings Are Created?
They need to be detailed, accurate, and easy to follow so that everyone involved in the project knows exactly what to do. Here is how they are made.
Understanding the Project Requirements
The process starts with gathering all the necessary information. This includes architectural plans, structural details, material specifications, and any special design requests. Designers and drafters review these details to understand what the glazing system needs to look like and how it should function.
Creating Initial Drawings
Once the requirements are clear, drafters begin creating the first set of drawings. These include the basic layout of glass panels, frames, and other components. At this stage, the focus is on overall dimensions, placement, and how different parts will connect.
Adding Detailed Specifications
After the initial drawings are complete, more details are added. This includes:
- Exact glass sizes and types
- Frame and hardware details
- Sealants and gaskets
- Elevation and section views
- Step-by-step installation instructions
These details help fabricators cut glass and frames correctly and guide installers during assembly.
Reviewing and Making Changes
Once the drawings are ready, they are shared with architects, contractors, and other project members for review. If any changes are needed, the drawings are updated to fix errors or improve the design. This step helps avoid problems later during fabrication and installation.
Getting Final Approval
After all changes are made, the final drawings are submitted for approval. Clients, architects, or project managers check them one last time to confirm everything is correct. Once approved, these drawings become the official guide for manufacturing and installation.
Using the Drawings for Fabrication and Installation
Fabricators use the drawings to cut and prepare glass, frames, and hardware. Installers follow the instructions to put everything together on-site. If any issues come up, they refer back to the drawings to find solutions.
Bringing It All Together
To sum it up, glazing shop drawings act as a detailed guide that helps fabricators, contractors, and installers work with accuracy. These drawings show exact glass sizes, frame details, hardware placement, and installation steps, making the entire process smoother and more efficient.

Without clear shop drawings, projects can face misalignment issues, delays, and extra costs. Mistakes in fabrication or installation can lead to wasted materials and rework. That is why these drawings are so important. They help teams avoid errors, improve communication, and keep the project on track.
Creating glazing shop drawings involves several steps, from understanding project needs to getting final approval. Once completed, these drawings serve as a reliable reference throughout the project, from manufacturing to installation.
A well-prepared set of glazing shop drawings not only makes the job easier but also improves the final result. Whether for curtain walls, storefronts, or glass partitions, these drawings help bring designs to life with precision and efficiency.