
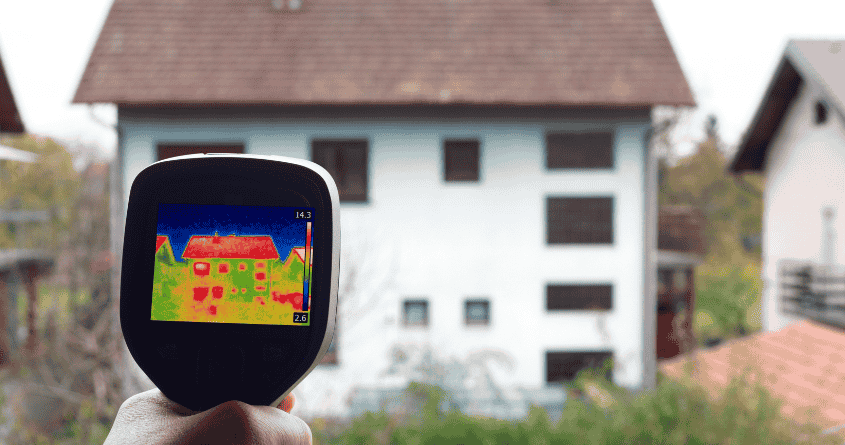
The process of capturing the shape and details of buildings, objects, or spaces using millions of tiny data points is often referred to as point cloud technology. These points are gathered by 3D laser scanners or cameras, which create a digital map of the area. This detailed data is then used to build accurate 3D BIM models for design and construction.
The challenge is transforming the raw data into a BIM model that can be used for various architectural and construction purposes, such as renovations, restorations, or even creating new designs based on existing structures. If you’re new to this, it might sound complex, but it’s easier than you think when broken down into steps.
This guide will walk you through the basic steps in converting point cloud data into a usable BIM model. This beginner’s guide aims to simplify the process, helping you understand how to accurately convert point cloud data into a detailed, functional 3D model using BIM software.
So, let’s begin!
Step 1: Capturing Point Cloud Data
This is the foundational step where the actual physical environment is scanned to generate a point cloud.
Laser Scanning
- High-precision 3D laser scanners (such as those using LiDAR technology) are deployed on-site. These scanners emit laser beams that bounce back after hitting surfaces, recording millions of data points representing the geometry of the building or space.
- The laser scanning process covers all visible surfaces—walls, floors, ceilings, MEP (mechanical, electrical, and plumbing) systems, structural elements, and even furniture or fixtures.
- Scans are usually taken from multiple angles and positions to capture all parts of the building. The laser captures 360-degree views to ensure complete data coverage.
Photogrammetry
- Sometimes, photogrammetry is used in conjunction with laser scanning. It involves taking high-resolution images from multiple perspectives and using software to generate a point cloud from these images. While less accurate than laser scanning, photogrammetry helps capture specific details or textures.
The result is a large, dense dataset known as the point cloud, which contains millions (or even billions) of individual points, each with X, Y, and Z coordinates, representing the geometry of the building in 3D space.
Step 2: Point Cloud Processing
Once the raw point cloud data is captured, it must be processed to make it usable for BIM modeling.
Data Registration
- Multiple scans taken from different positions are not automatically aligned. Registration involves stitching these separate scans together to create one coherent point cloud.
- Registration software (such as Autodesk ReCap, Leica Cyclone, or FARO Scene) automatically detects overlapping areas between scans and aligns them, ensuring that all scans fit together with millimeter-level accuracy.
Noise Filtering
- The raw point cloud will inevitably contain some noise—points that don’t belong to the actual structure. This might include points from temporary objects like people moving through the scene, vehicles, or irrelevant environmental details.
- Specialized software tools are used to remove unwanted points and clean up the dataset, improving the clarity and usability of the point cloud for BIM modeling.
At the end of this step, you have a clean, registered point cloud dataset, which can be exported in common formats such as .RCP, .RCS, or .E57.
Step 3: Importing Point Cloud into BIM Software
With point cloud processing, the next step is to import the data into a BIM platform, such as Autodesk Revit, ArchiCAD, or other compatible tools.
Software Import
- Most BIM software supports common point cloud formats like RCP/RCS (Autodesk’s proprietary formats) and E57 (an open exchange format for point cloud data).
- The imported point cloud appears as a reference model within the BIM software. It provides a highly accurate 3D visualization of the structure.
Working with Point Clouds
- In the BIM environment, the point cloud is displayed as a collection of dots that represent the surfaces of the building or structure.
- Users can zoom in, pan around, and section through the point cloud to observe specific areas for modeling purposes.
Step 4: Modeling from Point Cloud
This step involves converting the 3D points into BIM components. Depending on the level of detail and the software used, this can be a manual, semi-automated, or fully automated process.
Manual or Semi-Automated Modeling
- In most cases, the BIM technician or modeler traces over the point cloud manually, using the points as a guide to create BIM elements like walls, floors, doors, windows, beams, and columns.
- Semi-automated tools can assist in detecting certain shapes or forms (like straight lines for walls or circular pipes for MEP systems) and generating the corresponding BIM objects, but the process often requires human input for accuracy and precision.
Architectural Modeling
- Walls: Walls are modeled by tracing the points along their edges. Software like Revit has tools to align these points and create precise wall models.
- Doors and Windows: Openings in walls are modeled by detecting voids or gaps in the point cloud. Parametric families (predefined door/window types) can be inserted based on the dimensions derived from the point cloud.
Structural Modeling
- Beams, Columns, and Slabs: Similar to architectural elements, beams, and columns are identified and modeled by tracing their boundaries in the point cloud. Structural analysis tools may also be used to analyze the elements and add more detail as needed.
MEP (Mechanical, Electrical, Plumbing)
- For more complex scans involving HVAC ducts, piping, or electrical systems, the modeler follows a similar approach by identifying the positions and dimensions of MEP components. Specialized software may assist in recognizing these elements.
The complexity of this step can vary depending on the Level of Detail (LOD) required. For example, a simple model for spatial analysis may only require basic geometry (LOD 200). Whereas a highly detailed model for fabrication would require precise modeling of every element (LOD 400 or 500).
Step 5: Level of Detail (LOD)
The Level of Detail (LOD) determines the amount of information and precision incorporated into the BIM model:
- LOD 100: Basic massing model with overall shapes but without specific details.
- LOD 200: Generalized geometry for spatial analysis, indicating basic placements and sizes.
- LOD 300: The model contains precise geometry, with accurate sizes, locations, and details. That can be used for design and coordination.
- LOD 400: The model includes detailed elements ready for construction or fabrication.
- LOD 500: An as-built model, representing the exact construction of the building, ideal for facility management.
The level chosen depends on the project requirements, such as for renovation projects, retrofits, or facility management.
Step 6: Clash Detection and Validation
This step involves quality control and error checking:
Clash Detection
- BIM software includes tools to check for clashes between different systems in the model. For example, checking if pipes are intersecting with structural beams.
- Running a clash detection process ensures that the different elements modeled from the point cloud do not conflict with one another in the real world.
Model Validation
- Once the model is complete, it’s essential to validate it by comparing the final BIM elements to the original point cloud. This make sure that every wall, window, beam, or pipe is modeled accurately and aligns with the existing conditions of the building.
Our Final Thoughts
In summary, converting point cloud data to a BIM model is a valuable process for architects, engineers, and construction professionals. This process helps create accurate models of real-world structures, making it easier to plan and manage projects effectively.
Throughout this guide, we discussed the steps involved, starting from 3D laser scanning to gathering point cloud data and then turning that data into a detailed BIM model. As technology continues to grow, knowing how to convert point cloud data to a BIM model will help you stand out in the industry. It can save time, reduce mistakes, and help everyone involved work together more smoothly.